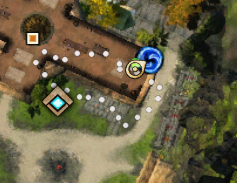
The entrance for Janthir Wilds Convergences is in Lowland Shore. Go to Harvest Den waypoint [&BK4OAAA=].
The Convergence Portal is on the east side of the Bonfire Lodge (blue swirl on minimap).
JW Convergence EntranceEast side of the building
Public Convergences
Public Convergences can be entered for free at designated times. Public Convergences are always normal mode.
The public boss rotates each week.
Public Convergence Times
Public instances open every 3 hours.
Next Public opens at 7/19/2026 6:00:00 PM +00:00 in
00:00:00
Private Convergences
Private Convergences can be opened whenever you want.
Opening costs an Unstable Rift Motivation.
Private Convergences can choose between normal or challenge mode.
A full 50 man squad is recommended.
Items you should bring
Both the Potion and Sigil of Demon Slaying provide bonus damage vs Titanspawn.
The potion can be used by any DPS, while the sigil only works for Power builds.
The PPR 'Mark Location' function stores where you are for 30 seconds and will let you rewind back to that location from anywhere on the map.
During the Thumper phase, when you have enough essence to turn in, use this at your thumper then get on your Warclaw and race to turn in the essence.
Use the PPR 'Rewind' function to instantly teleport back to your thumper.
Note: any form of teleporting will delete the stored location (e.g. using a portal or shadowstepping).
Stacking sigils can be built up easily in the pre and Thumper phases.
Lowland Expertise
Lowland Expertise is a buff you can purchase from each of the hearts in Janthir Wilds.
This buff is per character, so you'll need to do this for each character you plan to Converge with.
Each stack of Lowland Expertise gives a different buff:
+10% Experience
+10% Karma
+10% Gold
Gain additional map material from Kodan Caches
Gain fury when striking an enemy with the warclaw's dismount attack
Gain additional Unusual Coins from Kodan Caches
+5% Damage vs. titanspawn
As far as Convergences go, we care only about the 5th and 7th stacks.
You can farm all 7 stacks in a single day. Each of the hearts in Janthir Wilds sells it after completing it every day.
Each time you buy Lowland Expertise, it adds a stack. Additional purchases won't increase it past 7 stacks, but will increase the timer before it expires by 4 hours. This timer also caps at 24 hours.
You should only need to do some hearts every couple days to keep the buff up, as it doesn't count down unless you're logged in on that character.
If you let it expire, you will need to redo all 7 stacks of Lowland Expertise.
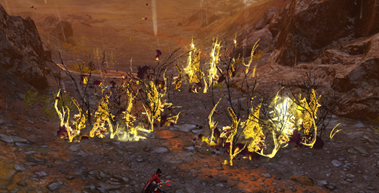
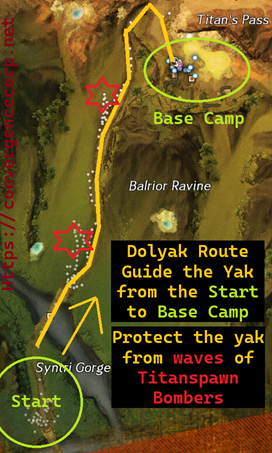
Dolyak Escort
The initial phase of a Mt. Balrior Convergence is to escort the teams pack dolyak up to the Base Camp.
On the way up you'll be met with 2 waves of Titanspawn and Bombers.
You must clear all of the Titanspawn and Bombers for the pack dolyak to advance.
The bombers will die quickly after breaking their breakbar.
Dolyak Party
While the dolyak is traveling, it can be given swiftness or superspeed.
Doing this is important as the Bombers will not spawn until the dolyak's party arrives.
After killing the second wave of Bombers, continue on to the Warclaw Doors while the dolyak party finishes running to the Base Camp!
Dolyak Route
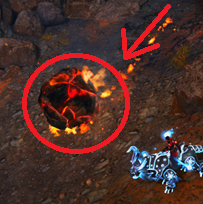
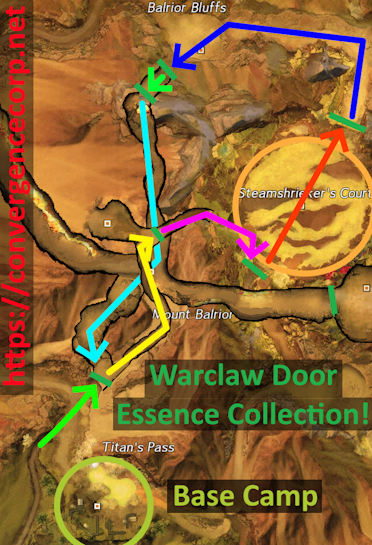
Warclaw Door Essence Collection
The timer is paused while the bears build the Base Camp.
Use this time to collect essence from the Warclaw Doors!
The ENTIRE squad should run up and take down the Warclaw Doors.
Each door drops about 5 essence.
Taking out all 6 Warclaw Doors along the path will give everyone about 30 essence to start the Thumper Phase with.
Take down the warclaw doors and pickup the essence!
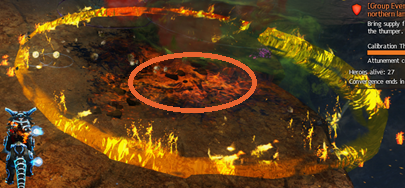
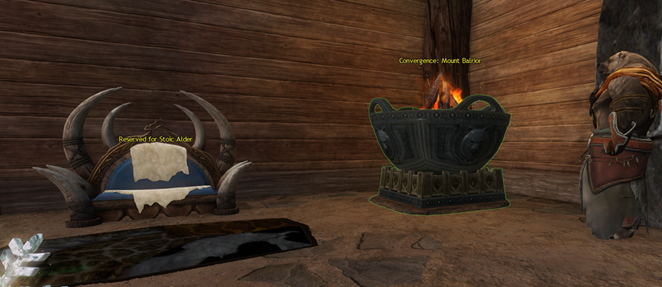
Thumper phase
After running the entire warclaw door route, you'll be back at the Base Camp!
Do not immediately turn in your essence.
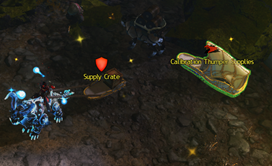
Grab a Supply Crate with your warclaw from the Calibration Thumper Supplies in the Base Camp and take it to your assigned Thumper.
The subgroup assigned to the Base Camp should help South East build their thumper.
Pickup a supply crate from the wagon!
BUG WARNING:
If more than 1 person sniffs the thumper, it will bug and not be built.
If enough people with supply are standing in the ring when it's sniffed, it will also bug.
Once built, the thumper needs to be defended from waves of titanspawn for 3 minutes.
After those 3 minutes, a titan disruptor spawns. Kill it to finish the thumper.
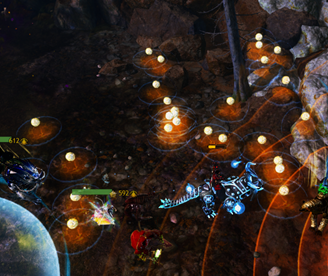
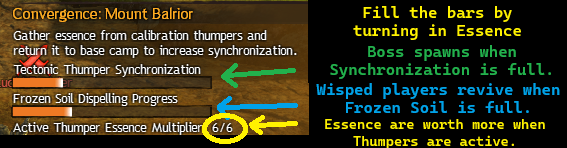
The goal of the thumper phase is to fill the Tectonic Thumper Synchronization bar.
Fill this bar by turning in essence produced by the thumpers.
Every time you get 40+ essence, you should turn it in to fill the bar.
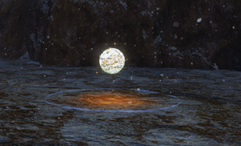
Keep control of the Base Camp to prevent the Synchronization bar from falling.A lone essence waiting to be collected.
Splitting up the squad
As with any 50 man squad, there should be 10 subgroups.
I suggest sending 1 subgroup to Southeast and designate 1 to defend Base Camp.
The other thumpers should all get 2 subgroups.
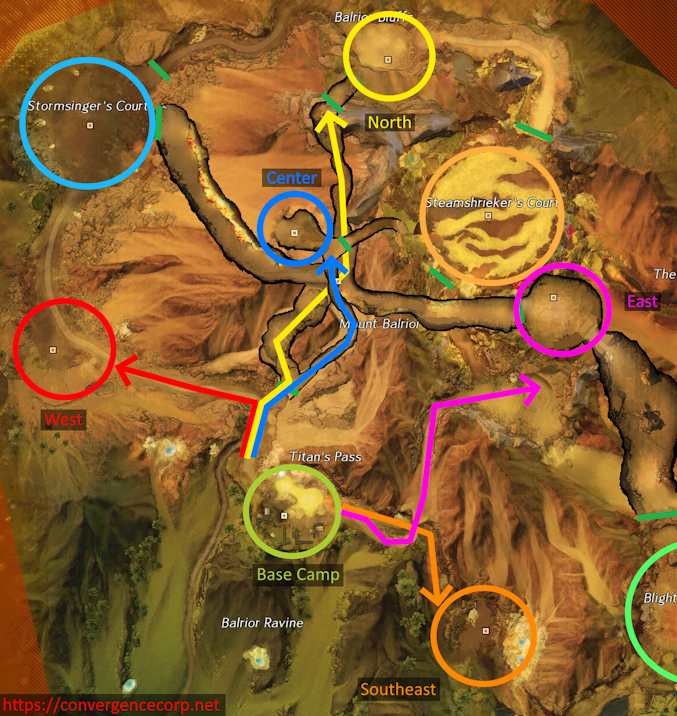
Shortest paths to each Thumper from the Base Camp
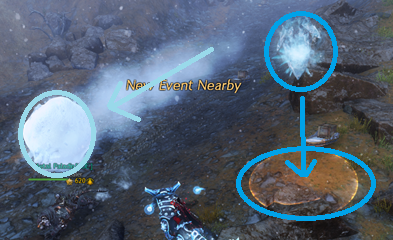
Side Events
Side events spawn during the Thumper phase.
The first event will spawn 2 minutes after the thumper phase starts, and subsequent events every 4 minutes.
If done correctly, the Thumper phase ends before the second event happens.
Completing a side event will spawn Projections of Distant Memory around the map where you can turn in your essence.
There are 2 possible side events: Titanspawn Sapper and Titanspawn Leader
Titanspawn Sapper
The Sapper steals essence from the Base Camp thumper.
Use your warclaw's Sniff skill to reveal the Sappers location on your minimap.
Break the Sapper's defiance bar with your Warclaw's Chain Pull (3) skill to make it vulnerable to damage.
Once defeated, the Sapper will drop the essence that it stole.
If the Sapper succeeds in walking all the way to one of the 3 courts, it will disappear, taking the stolen essence with it.
Titanspawn Leader
A Titanspawn Leader will spawn in one of the 3 courts and walk toward the Base Camp.
Titanspawn Leaders drop a full bar of essence for everyone around.
Once defeated, the Titanspawn Leader will drop a full bar of essence for every person.
As many people as possible need to collect this essence for maximum efficiency.
Weather
When the Tectonic Thumper Synchronization bar is 30% full, weather conditions will worsen around Mt. Balrior.
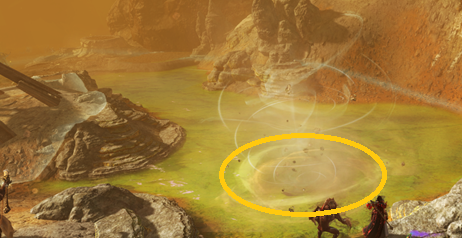
Sandstorm
Reduced Visibility. Sand Swirls - Knock up and blind.
A sandswirl
Snowstorm
Blizzard - Ice formations fall on the ground, damaging and chilling. Snowballs roll down the mountain.
Thunderstorm
Lightning Strikes - Lightning hits all over the mountain.
Volcano
Rain of Fire - Meteors and Shockwaves. Indicator for a meteor impactShockwave from the meteor impactLava Rocks roll down the main paths. A lava rock rolling down the hill
Mist Tides
When the Tectonic Thumper Synchonization bar reaches 70%, the Mists Tide rolls in.
Which Mist Tide depends on what the boss is.
Decima - Lightning Strikes
Greer - Blighted Strikes
Blighted Strikes
Ura - Titanspawn Gysers
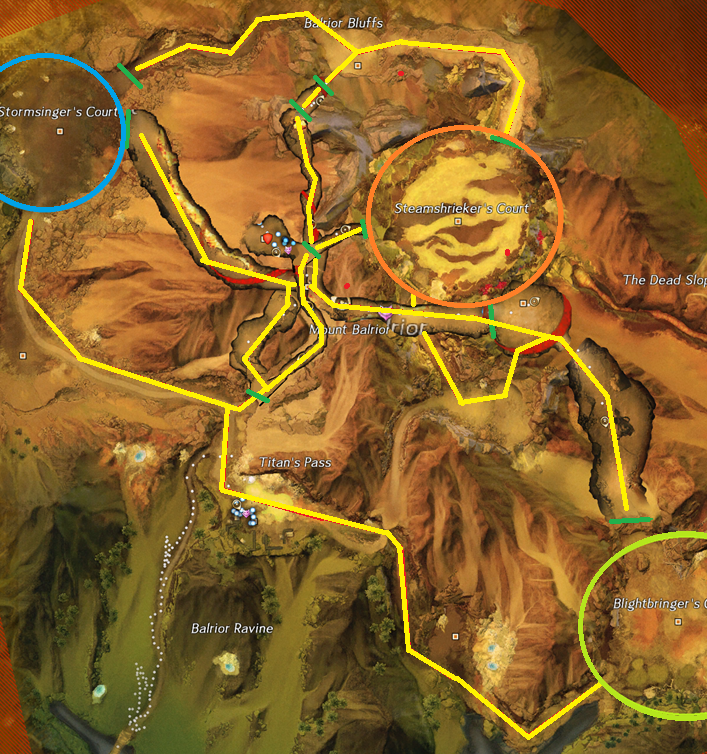
Shared Boss Mechanics
The titans could take any combination of these paths inbetween each Court.
Calibrated Essence
The boss drops essence every 10% of their hp. Unlike SotO, there is no extra essence at the end of each phase.
Hold on to the essence for increased stats.
During the boss fights, you should hold onto all of the essence you can, It's rare enough that building it back up to 50 will take you at least 2 full phases.
The Tectonic Thumper should stay calibrated for the whole fight.
As a result, people that get wisped will likely never come back after the initial boss spawn. Every down counts.
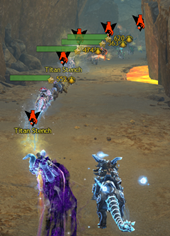
Trail of Titan Stench
Phase Transitions
Each boss has 4 phases.
At the end of each phase, the boss will burrow into the mountain and move to a new location.
The titan will always start at the Steamshrieker's Court.
The second and third phases will be at Stormsinger's and Blightbringer's Courts, in random order.
The last phase will always come back to Steamshrieker's Court.
Sniffa
They leave behind a trail of Titan Stench.
Track it with your warclaws sniff skill and collect as much Titan Stench as you can.
TP to boss
When enough Titan Stench has been collected by the group, the boss will unburrow.
A special action key will appear near your health, use it to TP to the boss.
Decima, the Stormsinger
Extensive Rock Collection
Strategy
Decima employs several physical and electric attacks.
She surrounds herself with several pylons and charges them with her Fluxlances.
She also creates Fulgent Fences between the pylons and attempts to push and pull you into them.
Bring stability to avoid getting pushed into the fences.
A single dedicated subgroup can bait Fluxlances by being the furthest people from Decima(while still in combat).
Minimize the amount of pylons you charge by aiming the orange Fluxlances away from them.
Phase 3 and 4, Fluxlance turns into Fluxlance Fusilade.
Decima's Passives
Chorus of Thunder
At the end of each phase Decima consumes all stacks of Peal of Harmony and Discord.
She deals damage with Chorus of Thunder based on how many stacks she consumed.
Decima gets stacks by having the greens reach her.
Peal of Harmony
For each stack: Decima targets an uncharged conduit nearest the farthest player with Chorus of Thunder.
Peal of Discord
For each stack: Decima targets the closest player with Chorus of Thunder.
Decima's Skills
Phase 1 and 2 (100%->50%)
Foreshock
Decima stomps to the left, then the right, and then in front of her.
Decima stomps to her left, then to her right.Decima stomps a large circle in front of her.
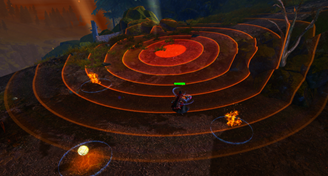
Mainshock(Pizza)
Decima slams an orb of arcane flux into the ground, causing the ground to rupture up around her. The ground ruptures from the front to the back. This knocksback and applies Vulnerability.
Aftershock
Electric explosions slowly explode outward to the edge of Decimas attack range, then come back inward.
Seismic Crash(body slam)
Decima jumps up and slams into the ground, causing the immediate vicinity to erupt with jagged rocks and pyrite.
This deals more damage the closer you are to Decima.
Players hit will be pushed outward toward the Fulgent Fences.
Players that collide with the fence will be hit with Reverberating Impact and ricochet.
Earthrend (outside pizza ring)
Decima jumps up and attacks beyond the pylons, causing the ground to erupt with jagged rocks and pyrite.
The tremendous force pulls players inward toward the Fulgent Fences.
Players that collide with the fence will be hit with Reverberating Impact and ricochet.
High above Decima, you can see how large Earthrend is as she pulls your allies into the Fulgent Fence.
Fluxlance
Fluxlance fires once.
It has an orange or red version.
Both versions use a red border on your screen to indicate you are being targeted.
If you have the orange version, aim the arrow behind you to avoid hitting a pylon.
Hitting one of the pylons charges it, creating a Fulgent Aura around it and making the pylon send a green when Decima calls for them.
If you have the red version, hide behind any pylon or you will be deleted. It deals over 700k damage and cannot be blocked or dodged.
Hiding behind a pylon with a red Fluxlance.Decima firing the Red Fluxlance.
Phase 3 and 4 (50%->0%)
Fluxlance Fusilade
In the last 2 phases Fluxlance is exchanged for Fluxlance Fusilade.
Fluxlance Fusilade is fired five times in sequence, and alternates between 5 orange arrows, or 4 orange and 1 red arrow.
The arrows target the five furthest players from Decima that are still in combat.
They fire in order, marked by a roman numeral over the targeted players heads.
Just like the normal Fluxlance, avoid hitting pylons with the orange arrows.
Hide behind a pylon with the red arrow.
Swirling Winds
Decima channels the storm winds to push players either clockwise or counter-clockwise.
She usually does this in combination with Fluxlance Fusilade in an attempt to get you to hit/miss pylons.
Enlightened Conduit (pylons)
A Charged Enlightened Conduit with Fulgent Aura. A green is moving toward Decima.
Fulgent Fence
Pylons link up with each other to create electric fences.
If you run into the Fulget Fence, it'll kick you back with Reverberating Impact.
Fulgent Aura
Red aoe around the pylon. Grows when hit by Fluxlances.
The bigger the Fulgent Aura, the bigger the green that will spawn from the pylon.
Reverberating Impact
When you get pushed into a pylon or Fulgent Fence, the electric shock kicks you back the other direction.
Greens
Greens spawn from charged pylons and move toward Decima.
If it reaches Decima, she gains a stack of Peal of Harmony/Discord.
The more charge a pylon has, the bigger the green that spawns from it.
Stand inside the green to stop it from reaching Decima.
Above the green is an icon indicating the number of people that are needed to stand inside it.
Downed and wisped people still count towards satisfying the greens.
This group managed to charge nearly every pylon, leading to greens spawning from every charged pylon.
Green Skills
Sparking Aura
Greens deal a small amount of damage to people standing in them. This is unblockable.
Greer, the Blightbringer
Poison | Area Control | Boon Corruption
Strategy
Greer has an arsenal of large aoes that can corrupt your boons and stack conditions on the whole squad.
Bring reflects and blocks to take care of his projectiles.
Condi cleanse for when your boons get corrupted and move out of the Noxious Blight!
Gree and Reeg
Gree, the Bringer and Reeg, the Blighter are at the start of each phase.
They are positioned on opposite sides of Greer from each other.
Fight them BEFORE moving on to Greer to simplify the mechanics significantly.
They go away after losing 25% of their hp each phase.
Gree and Reeg both use several of the same skills that Greer uses.
Breakbar
Each phase has a breakbar to break when Greer gets to a health threshhold.
These threshholds are 80%, 60%, 30%, 10%.
After using all the CC skills you have, mount up on your warclaw and spam skills 3 and 4 for additional CC.
Greer uses Rot the World while the breakbar is up.
Greer's Skills
Phase 1 (100%->75%)
Eruption of Rot(Greens)
People at random get green circles on them.
An icon above them indicates how many people need to be inside EoR to satisfy it.
Failing to satisfy the EoR requirements results in you getting knocked up and a Noxious Blight spawned directly underneath you.
In Convergences, EoR can be stacked without penalty.
Players stacking to try and satisfy the three EoR.
Noxious Blight
Large purple pools of corruption, don't stand inside.
Standing inside corrupts two boons into conditions every tick.
A Noxious Blight. Don't stand inside it.
Aura of Corruption
Greer casts a purple aoe directly beneath himself.
Standing inside adds a stack of poison every tick.
Blob of Blight(Orbs)
Greer spawns several purple/gold orbs that chase the furthest people from him.
The orbs emit smaller orbs in all directions.
If the big orb hits a player, it becomes stationary and continues to fire smaller orbs for several seconds.
Blob of Blight
Scattering Sporeblast
Greer aims with his left arm and blasts several spores in a cone in front of him. Players in this cone will be directly targeted.
Rain of Spores
Greer leans forward and shovels up some spores with his hands.
He then holds them up and fires the spores at players.
Rot the World
Greer uses this skill when his breakbar is up.
Greer raises up his left hand and emits orbs across the whole court.
When the orbs land, they explode.
Rot the World
Sweep the Mold
Greer raises his left arm to the right and sweeps it across the ground in a 60-degree cone, damaging, bleeding, poisoning, and knocking back players.
Sets up Rake the Rot.
Rake the Rot
Follows Sweep the Mold, but only sometimes.
Greer raises his left arm to the left and and rakes it across the ground in front of himself.
Sets up Stomp the Convergence.
Stomp the Convergence
Follows Rake the Rot, but only sometimes.
Greer raises up and stomps the ground three times.
Phase 2 (75%->50%)
Ripples of Rot(Fence)
Greer casts two waves on either side of him.
They push back anyone hit by the wave and create a fence at the edge.
You can't go through them.
Ripple of Rot spreads from Greer in 2 waves.Ripple of Rot creates fences at the edge of the waves reach.
Phase 3 (50%->25%)
Cage of Decay
Greer shoots out 5 Cage of Decay projectiles that travel along the ground.
When they reach their destination, it becomes a Noxious Blight with Ripple of Rot fences surrounding it.
A Cage of Decay, made up of a Noxious Blight with RoR Fence surrounding it.
Enfeebling Miasma
Greer leans forward and roars, spawning several purple aoes that move away from Greer in a clockwise spiral pattern.
Enfeebling Miasma spiraling away from Greer's head.
Seeds of Decay
The shattered fragments of Greer's armor rain down on the arena.
Smaller pieces explode on impact, but larger fragments transform into titanspawn, ready to help Greer in the fight.
I believe this happens upon breaking Greer's breakbar.
Phase 4 (25%->0%)
Greer has no new skills in phase 4.
Ura, the Steamshrieker
Mistress of Effluence
Strategy
Bring CC! Ura gets a new breakbar every 5%!
During the fight, Ura builds up stacks of Rising Pressure, buffing her defensive and offensive stats by 5% for each stack.
Break the breakbar to remove them.
Avoid standing infront of Ura. Her bubble attack always goes to the front.
Consider dumping some healers in favor of more boondps for more dps.
Ura's Passives
Rising Pressure
When Ura's breakbar is up, she gains stacks of Rising Pressure. Every stack gives Ura 5% increased damage and 5% damage reduction.
CC the breakbar and the stacks she's built up will fall off.
Scalding Aura
Ura has a super heated puddle of acid underneath her the entire fight. Applies burning.
Ura's Skills
Slam
Ura slams side to side, then raises up and slams a cone in front of her.
Ura's third Slam
Pressure Blast - Bubble
Ura reaches forward with her hands and Pressure Blasts directly in front of her.
Don't stand in front of her or you'll get lifted.
The bubbles spread to nearby players, potentially lifting the whole group even if only one person was standing in the aoe.
Ura using Pressure Blast and everyone avoiding it.Everyone getting bubbled by Pressure Blast
Propel
Ura leaps towards the furthest player. Massive damage on landing, don't chase her until she actually lands as the impact is bigger than it looks.
Sulfuric Acid
Deals damage every second and applies Exposed every 10 seconds.
Sulfuric Froth
Sulfuric Acid spills out of Ura as she moves around, leaving puddles of Sulfuric Froth around. Applies Sulfuric Acid.
Acid Spray
Ura sprays acid from her hands. Applies Sulfuric Acid.
Toxic Geyser
Applies poison and Sulfuric Acid, and grants protection and might to Ura.
Fumaroller
Elite Fumarollers start spawning in the 2nd phase(75%). They have MASSIVE CC bars and will need to be focused by the whole squad to break it.
Champion Fumarollers will spawn in the 4th phase(25%). They can not be CC'd at all and gain enhanced skills over their Elite versions.
Rock Smash
The Fumaroller hits a player with its face.
Full Steam
The Fumaroller charges a player.
Mantle Grinder
The Fumaroller spins around on the ground.
Ejects
The Fumaroller Ejects several streams of Sulfuric Acid from the top of themselves, similar to Ura's Sulfuric Froth.
The Champion Fuma Ejects more streams over a larger area.
Breaking Ground (Red Star)
The Champion Fumaroller applies a star symbol on the ground. Applies burning.
 Janthir Wilds
 Lowland Expertise
 Experience
 Sniff skill to reveal the Sappers location on your minimap.
Break the Sapper's defiance bar with your Warclaw's Chain Pull (3) skill to make it vulnerable to damage.
Sniff skill to reveal the Sappers location on your minimap.
Break the Sapper's defiance bar with your Warclaw's Chain Pull (3) skill to make it vulnerable to damage.